数据模板
数据模板是一段如何显示绑定在VM对象的XAML代码。数据模板可以包含任意元素的组合,基于Binding来显示不同的信息。
在实际的开发中数据模板的应用场景很多,同样一个控件可以根据不同的绑定源,根据以设置好的数据模板可以显示对应的不同的内容。
很多人用不好控件模板和数据模板,觉得有点混乱,大部分都是在追求7天入门WPF,或者直接就问有没有快速解决我目前问题的办法,等等。我也没有,但是数据模板其实比控件模板更好写,因为他的思路比较简单,就是这个数据,通过Binding后,界面上要显示成什么样。就这样。然后我们基于这个理解来延伸内容。
首先创建一个用于显示列表的ListBox我们模仿商店出售的商品。为了便于理解,所有的布局我都使简单的grid分割不涉及其他布局。
<ListBox Name="ProductsListBox" MaxWidth="290" HorizontalContentAlignment="Stretch"> <ListBox.ItemTemplate> <DataTemplate> <Border Margin="5" CornerRadius="5" BorderThickness="1" BorderBrush="SteelBlue"> <Grid> <Grid.RowDefinitions> <RowDefinition Height="Auto"/> <RowDefinition Height="Auto"/> <RowDefinition/> </Grid.RowDefinitions> <TextBlock Margin="3" FontWeight="Bold" Text="{Binding Path=Name}"/> <Grid Grid.Row="1"> <Grid.ColumnDefinitions> <ColumnDefinition Width="Auto"/> <ColumnDefinition Width="*"/> </Grid.ColumnDefinitions> <Grid> <Grid.ColumnDefinitions> <ColumnDefinition Width="Auto"/> <ColumnDefinition Width="*"/> </Grid.ColumnDefinitions> <TextBlock Text="单价:"/> <TextBlock Grid.Column="1" Text="{Binding Path=Price}"/> </Grid> <Grid Margin="1,0" Grid.Column="1"> <Grid.ColumnDefinitions> <ColumnDefinition Width="Auto"/> <ColumnDefinition Width="*"/> </Grid.ColumnDefinitions> <TextBlock Text="剩余数量:"/> <TextBlock Grid.Column="1" Text="{Binding Path=Number}"/> </Grid> </Grid> </Grid> </Border> </DataTemplate> </ListBox.ItemTemplate> </ListBox>我们在ListBox中定义了ItemTemplate的DataTemplate。DataTemplate会再ListBox的ItemsSource绑定数据源后,拿出在DataTemplate中Binding的值,然后按照我们当前得DataTemplate来渲染。
我们定义在ItemTemplate下的数据模板,就是修改ListBox中的子对象如何显示。
完成代码如下:
xaml代码
<Window x: cs代码如下:
using System.Collections.Generic;using System.Windows;namespace HowtoUseDataTemplate{ /// <summary> /// MainWindow.xaml 的交互逻辑 /// </summary> public partial class MainWindow : Window { List<Product> products; public MainWindow() { InitializeComponent(); products = new List<Product>() { new Product(){Name="火箭弹",Price=1000.00M, Number=5000,Introduce="这玩意要买大量的,便宜又方便、一次齐发。基本上就完成任务了。就是误差有点大。"}, new Product(){Name="自动步枪(删除敏感字眼)",Price=300.00M, Number=5000 ,Introduce="单兵装备"}, new Product(){ Name="爆震弹",Price=50.00M, Number=5000 ,Introduce="单兵装备"}, new Product(){Name="防弹衣",Price=100.00M, Number=5000,Introduce="单兵装备"}, new Product(){ Name="防弹头盔",Price=80.00M, Number=5000,Introduce="单兵装备"}, new Product(){ Name="特别特别硬之真防弹头盔",Price=99999.00M, Number=5000,Introduce="单兵装备名字特别长"}, }; ProductsListBox.ItemsSource = products; } } public class Product { public int Number { get; set; } public string Name { get; set; } public decimal Price { get; set; } public string Introduce { get; set; } }}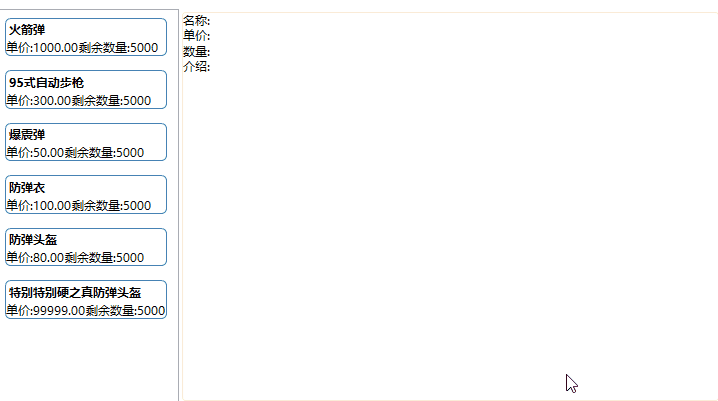
数据模板中还有一些常用比较方便的功能。比如数据触发器。和转换器,之前讲过。在之前讲了属性触发器、事件触发器。但是数据触发器没讲,这里讲一下。
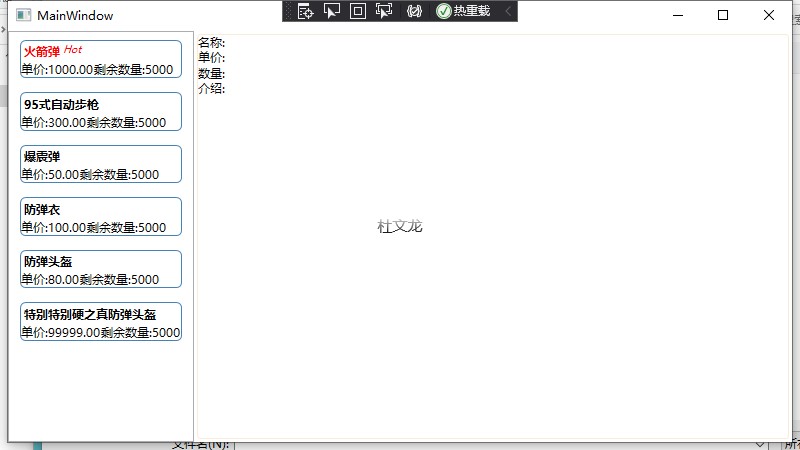
(删除敏感字眼) 举个例子,火箭弹热卖了。我们虚拟出来的软件产品既然包含了这些,产品经理就提出来要添加一个热卖产品的提醒功能,在产品名称旁边添加一个热卖品的红色hot斜体的文字显示,同时文字也要变成红色。
回想到我们刚才的数据模板,使用数据触发器来实现热卖品显示hot功能。在实体中添加是否是热卖品属性。实现转换器、实现数据触发器。
1)再工程下添加Converter文件夹
编写HotBoolToVisibilityConverter类,代码如下:
using System;using System.Globalization;using System.Windows;using System.Windows.Data;namespace HowtoUseDataTemplate.Converter{ public class HotBoolToVisibilityConverter : IValueConverter { public object Convert(object value, Type targetType, object parameter, CultureInfo culture) { if (value is bool b) { if (b) { return Visibility.Visible; } } return Visibility.Collapsed; } public object ConvertBack(object value, Type targetType, object parameter, CultureInfo culture) { throw new NotImplementedException(); } }}回到主窗体找到Priduct类,添加IsHot属性。设置默认值为false。
再Products中设置每个对象是否是热卖。完整代码如下:
using System.Collections.Generic;using System.Windows;namespace HowtoUseDataTemplate{ /// <summary> /// MainWindow.xaml 的交互逻辑 /// </summary> public partial class MainWindow : Window { List<Product> products; public MainWindow() { InitializeComponent(); products = new List<Product>() { new Product(){Name="火箭弹",IsHot=true, Price=1000.00M, Number=5000,Introduce="这玩意要买大量的,便宜又方便、一次齐发。基本上就完成任务了。就是误差有点大。"}, new Product(){Name="自动步枪(删除敏感字眼)",Price=300.00M, Number=5000 ,Introduce="单兵装备"}, new Product(){ Name="爆震弹",Price=50.00M, Number=5000 ,Introduce="单兵装备"}, new Product(){Name="防弹衣",Price=100.00M, Number=5000,Introduce="单兵装备"}, new Product(){ Name="防弹头盔",Price=80.00M, Number=5000,Introduce="单兵装备"}, new Product(){ Name="特别特别硬之真防弹头盔",Price=99999.00M, Number=5000,Introduce="单兵装备名字特别长"}, }; ProductsListBox.ItemsSource = products; } } public class Product { public int Number { get; set; } public string Name { get; set; } public decimal Price { get; set; } public string Introduce { get; set; } public bool IsHot { get; set; } = false; }}最后回到主窗体的XAML文件下,添加转换器的引用和资源。
找到数据模板中的商品名称,重新设计Grid布局并添加一个hot文本控件。
<Grid> <Grid.ColumnDefinitions> <ColumnDefinition Width="Auto"/> <ColumnDefinition Width="*"/> </Grid.ColumnDefinitions> <TextBlock x:Name="NameTextBlock" Margin="3" FontWeight="Bold" Text="{Binding Path=Name}"/> <TextBlock Margin="0,2,2,2" Visibility="{Binding IsHot,Converter={StaticResource HotBoolToVisibilityConverter}}" FontSize="10" Grid.Column="1" Font Text="Hot" Foreground="Red"/></Grid>写一个数据触发器,当IsHot等于true的时候。去找模板中Name=NameText的控件,设置他的Foreground颜色属性为红色,
<DataTemplate.Triggers> <DataTrigger Binding="{Binding Path=IsHot}" Value="True"> <Setter Property="TextBlock.Foreground" TargetName="NameTextBlock" Value="Red"/> </DataTrigger> </DataTemplate.Triggers>XAML完整代码如下:
<Window x: 效果如下,这样我们就实现了热卖的功能。通过数据模板只修改了很少一部分内容。
我们去看上面的XAML代码,我们现在只有一个简单的ListBox重写样式,就这么多内容需要写,那如果界面上内容特别多,代码不是很难读吗,我们接下来把代码拆出去。把DataTemplate写到当前窗体的Resources中。然后再ListBox中设置ItemTemplate等于我们再资源中定义的数据模板。代码如下:
<Window x: 这样Grid下的内容就少了很多,结构就清晰了一些。不建议把DataTemplate放到单独的文件夹中,因为如果App初始化的时候就加载了这些内容的话。可能targetType会影响到所有的使用了这个类的对象。但是其实也有x:key这个可以控制,所以这里具体看需要把。觉得怎么合适怎么来,反正主要的目标都是解耦。
再上面点击更换Item的时候有个比较讨厌的地方,选中的对象有一个蓝色的底色改变了,这个是ItemContainerSytle的内容。修改ListBox代码如下:
<ListBox Name="ProductsListBox" MaxWidth="290" HorizontalContentAlignment="Stretch" ItemTemplate="{StaticResource ProductItemTemplate}"> <ListBox.ItemContainerStyle> <Style> <Setter Property="ItemsControl.Padding" Value="0"/> <Style.Triggers> <Trigger Property="ListBoxItem.IsSelected" Value="True"> <Setter Property="ListBoxItem.Background" Value=" #84C1FF"/> </Trigger> </Style.Triggers> </Style> </ListBox.ItemContainerStyle> </ListBox>上面的数据模板中最外层的Border 外面嵌套一层Grid 同时背景色设置为和Listbox背景色一样,就可以拉。
这篇就写这么多。到这篇为止就打算基础部分结束了,下篇讲MVVM,IOC。就开始进入财务软件的项目实战,因为剩下一些没讲的章节,我整理了一下,大概是Page、Window、控件、TreeView、DataGrid等等。我觉得讲控件不属于入门知识,因为控件实际使用中包含了VM、数据模板、控件模板、Style还有更加深入的列表虚拟化、和数据虚拟化等等。还有怎么调试并分析问题等等。所以这里就不打算讲了。以后作为WPF技巧相关的文章,去梳理这些知识点。
我创建了一个C#相关的交流群。用于分享学习资料和讨论问题,欢迎有兴趣的小伙伴:QQ群:542633085
原文转载:http://www.shaoqun.com/a/760844.html
四海商舟:https://www.ikjzd.com/w/1516
1淘网:https://www.ikjzd.com/w/1698
数据模板数据模板是一段如何显示绑定在VM对象的XAML代码。数据模板可以包含任意元素的组合,基于Binding来显示不同的信息。在实际的开发中数据模板的应用场景很多,同样一个控件可以根据不同的绑定源,根据以设置好的数据模板可以显示对应的不同的内容。很多人用不好控件模板和数据模板,觉得有点混乱,大部分都是在追求7天入门WPF,或者直接就问有没有快速解决我目前问题的办法,等等。我也没有,但是数据模板其
菜鸟网:https://www.ikjzd.com/w/1547
淘粉吧怎么返利:https://www.ikjzd.com/w/1725
acedota:https://www.ikjzd.com/w/2070
愤怒!看着妻子变身DJ公主:http://lady.shaoqun.com/m/a/273445.html
亲眼目睹老婆被男上司抓胸:http://lady.shaoqun.com/a/271381.html
那一夜我疼得撕心裂肺 口述我和学妹的第一次恋情无疾而终:http://www.30bags.com/m/a/250586.html
No comments:
Post a Comment